How To: Cherry Blossom Nail Art

Shannon Smyth
Cherry Blossom Nail Art How To by @penelope9 via @agirlsgottaspa 
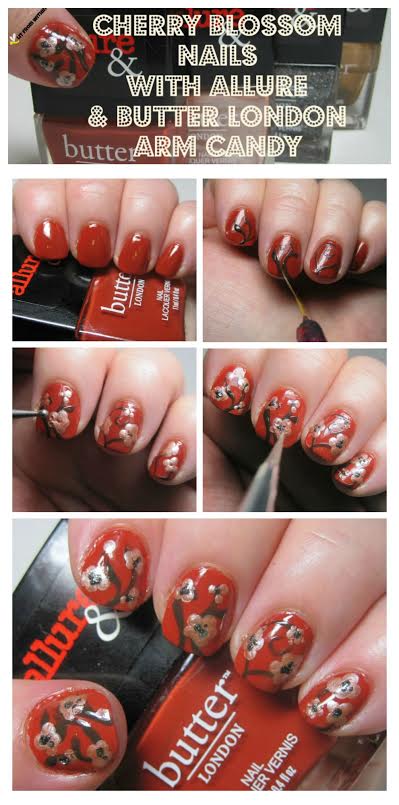
I'm loving all the rich Fall colors in the new Butter London x Allure collection!  I'm not yet ready for Fall, but I'm okay with winding down this hot, hot Summer.  So, let's do a mani of a typical Spring flower - the cherry blossom! What you'll need:
  • 4 polishes - in this case, I used all Butter Londons:  It's Vintage for the base, Lust or Must? for the branches, I'm On The List for the petals, and Disco Nap for the center of the flower.
  • A dotting tool or two
  • A thin striping brush
The first step is laying down your base coat if you use one, and then applying your color.  It's Vintage is a rich, rusty orange-leaning red that is retro and classy. Next, take a striping brush, and lay down some branches.  They don't have to be perfect - your blossoms can cover a lot of mistakes! I do like to make sure that there are branches in different sections of the nail, though, so that the blossoms have some place to go all over the nail.  Lust or Must? is like melted chocolate on your fingertips. For the petals, I put some of I'm On The List onto a small palette, and used one of my larger dotting tools to make a 4- or 5-dot circular pattern.  This rose gold metallic works great for this because it has a natural shimmer that gives the flowers some dimension.  Plus, it's opaque enough to cover the branches in one coat. For the center of the flowers, I used my smallest dotting tool and some Disco Nap to make 2 or 3 small dots.  The silver glitter helps it catch the light, but the base is dark enough to stand out against I'm On The List. Add some top coat to help blend the layers together and protect your nail art, and you're done! Thank you to Lit From Within for creating this great nail art tutorial! Subscribe to A Girl’s Gotta Spa! beauty blog. Watch our reviews on YouTube, see our pins on Pinterest and check us out on Instagram. Got a Kindle? We’re on Kindle too! *Disclosure: affiliate links

Read more →

Nail Art Blue Silver Rhinestones

Shannon Smyth1 comment
Nail art tutorial from @penelope9 (Lit from Within) for @agirlsgottaspa #nailart #nails Continuing to prove that nail art doesn't need to be difficult, I asked Nidia from Lit From Within to recreate a nail look with a tutorial.  For this nail art how to, Nidia took inspiration from A Nail Addict Named Sonia @badgirlnails. First, paint your nails with a fun glitter.  Go as blingy as you like, but if it's textured, you'll probably want to put down a thick topcoat before moving on with this look. When you're using striping tape, you need to wait for your base layer to be *completely* dry.  You can't fake this step.  Use a fast drying topcoat if you want to hurry the process a little, but putting tape on wet polish means that the polish will stick to the tape. The key is patience! Next, apply the striping tape in the pattern desired.  I'm doing accents on my ring and thumb, so I put the striping tape in a fan pattern for those, and more of a diagonal pattern for the others. After you've secured the tape (especially in the corners!) it's time for the coordinating polish.  Apply it in one thick layer, making sure that it's in all the nooks and crannies of your design. As soon as you're done with one nail, gently pull off the tape.  Don't let that polish dry, or it will come off in weird chunks! I like to clean up at this point.  My trusty $1 ELF concealer brush dipped in acetone is perfect for this. A topcoat fixes most mistakes, smoothes out the layers, and gives you a sticky surface on which to stick your rhinestones.  Use a little on the end of a dotting tool to help you move the rhinestones into place.  If you want the stones to stick better, apply another coat of topcoat over the stones. Nail art from @penelope9 for @agirlsgottaspa #nailart #howto #nails And, you're done! This is a great technique that can be used to create lots of different looks.  Use a base of neons under a coat of black, and you've got a laser light show! Change the direction of the tape and add studs to the center, and you can create a quilted look. If you liked this nail art, please feel free to stop by Lit From Within's Facebook page, Twitter, Instagram, Google+, or check out her blog, Lit From Within. Subscribe to A Girl’s Gotta Spa! Watch our reviews on YouTube, see our pins on Pinterest and check us out on Instagram and G+. Got a Kindle? We’re on Kindle tooShannon on G+

Read more →

Easy Abstract Floral Nail Art Tutorial

Shannon Smyth
If you're looking for some simple abstract floral nail art, here’s a tutorial to get this floral look in three easy steps, using only a couple colored polishes, a striping brush and dotting tool! Easy floral nail art tutorial via @agirlsgottaspa from @oblassa #nailart #tutorial #nails #floral Step 1: Polish your nails with a base color.  For this look I used Morgan Taylor One and Only. Step 2: With a striping brush, add some “grass” lines to the tips of your nails. For this look I used Precision Lacquer McDreamy. Step 3: With a dotting tool, add colored dots to represent the flowers; you can use any number of colors for the flowers to get a different look every time. (You can see a similar look I created with 3 flower colors here.) For this look I used Morgan Taylor Get Sporty With It and Morgan Taylor Lip Service. Top with your favorite topcoat and Voila! a simple abstract floral look. Tip for Fall: You can switch this up for fall by using orange and red toned polishes for the flowers and/or base color! Let us know if you try this look! Subscribe to A Girl’s Gotta Spa! Watch our reviews on YouTube, see our pins on Pinterest and check us out on Instagram. Got a Kindle? We’re on Kindle too!

Read more →

Stars and Stripes Nail Art How To

Shannon Smyth2 comments
It doesn't necessarily need to be the 4th of July to show your patriotic side. Show off your stars and stripes with these easy nail art how to's from editorial manicurist, Jin Soon Choi.

JINsoon Patriotic Nails - Get the look! #nailart

Look 1 Stars and Stripes 

How-To:

  1. Apply a base coat like JINsoon Power Coat
  2. Apply Michael Kors Gossip on the entire nail bed, leaving the ring finger bare
  3. Apply JINsoon Cool Blue to the entire nail bed of the ring finger
  4. Using JINsoon Coquette, apply horizontal stripes with a thin brush over the middle finger and the thumb
  5. Using JINsoon Coquette again, apply vertical stripes with a thin brush over the index finger and the pinky
  6. Apply JINsoon Polka White over the JINsoon Cool Blue on the ring finger to create the stars
  7. Apply a top coat like JINsoon Top Gloss over the nails for a lasting glossy finish

JINsoon Patriotic Nail Art #HowTo

Look 2 Patriotic Stripes 

How-To:

  1. Apply a base coat like JINsoon Power Coat
  2. Apply JINsoon Cool Blue on the entire nail bed
  3. Apply Michael Kors Gossip to the middle of each fingernail, leaving two stripes of blue visible on each side of the nail
  4. Apply a stripe of JINsoon Coquette in the middle of each nail
  5. Apply a top coat like JINsoon Top Gloss over the nails for a lasting glossy finish

Shop the look:

Subscribe to A Girl’s Gotta Spa! Watch our reviews on YouTube, see our pins on Pinterest and check us out on Instagram and G+. Got a Kindle? We’re on Kindle tooShannon on G+ *Disclosure

Read more →

Easy Nail Art Tutorial

Shannon Smyth2 comments
Super Easy Nail Art How To Using Dental Floss Honestly, the easy button was made for people like me. There are just some things I have no patience for, and nail art is one of them. I wish I could tell you that as a beauty blogger I am super creative and uber crafty and create endless nail looks to swoon over, but the truth is, my nails go bare most of the time. It's a tragedy really. For some reason, ever since I wore shellac back in 2011, my nails have never grown to any substantial length. But that's not my only excuse. I simply lack the skill required to paint cool scenes on my tiny nails. Then Pinterest to my rescue! I came across an amazingly easy nail art tutorial, and I was pretty excited to be able to recreate it with some modifications. You'll need: A large piece of paper 2 Flossers 3 Bottles of your favorite polish in complementary colors 1 Base Coat 1 Top Coat Easy Nail Art How To #nailart I recently received Ricky's NYC RickyColor Nail Polish in Final Share Weekend (hot pink), Sweating in the Subway (bright purple) and Banker Husband (bright teal.) This was a great opportunity to wear them all at once (and to show off my mad new skills.) How to:
  • Apply a thin layer of base coat.
  • Apply one solid color  to all nails. (I chose hot pink.)
  • Lay your paper flat. Towards the top swipe one color a few times (generously) in the same spot so that you have a thin layer of color.
  • With one hand under that part of the paper (to push the paper into the thread), use your other hand to dip the thread of your flosser into the pool. Be sure to ONLY get the thread covered in polish (or else it will be a big mess on your hands.)
  • Now firmly apply the floss three times across your nails on one hand in different spots. (I did mine straight across, stacked.)
  • Apply your final color on the paper, swiping enough to create a thin layer of it.
  • With one hand under that part of the paper, use your other hand to dip the thread of your flosser into the pool, getting only the thread wet with polish.
  • Firmly apply the floss three times across your nails on the same hand, but in different spots. (I did mine diagnol.)
  • Repeat these same steps on your other hand.
  • Lastly apply your top coat and let dry.
Easy peasy. I love that each nail doesn't look the same, yet it still looks cool. All the colors work together and the look is eye catching. The original how to called for putting the polish pooled in a bowl, but I didn't want to waste more color than I had to and I only wanted to get the thread wet with paint and not the whole flosser. What do you think? If you replicate this how to, let me know! Subscribe to A Girl’s Gotta Spa! Watch our reviews on YouTube, see our pins on Pinterest and check us out on Instagram and G+. Got a Kindle? We’re on Kindle tooShannon on G+ *Disclosure

Read more →